 Save
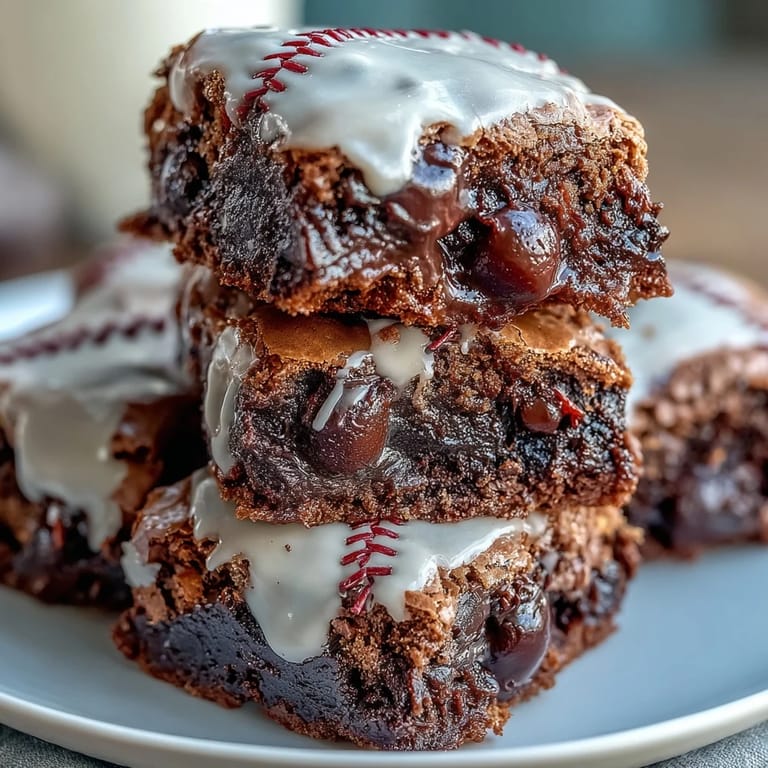
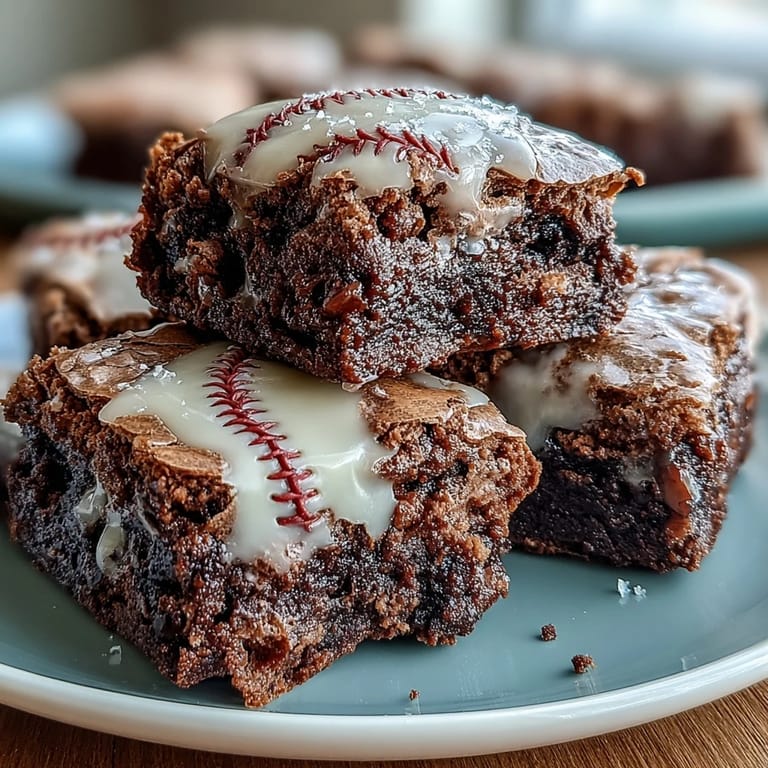
Save My nephew showed up to his little league game with a lunchbox full of store-bought cupcakes, and I remember thinking how impersonal they looked sitting there on the bleachers. That weekend, I decided to make something that actually felt like baseball—something bite-sized, fudgy, and decorated to look like the real thing. These brownie bites came together almost by accident, but the moment I piped those white icing laces onto the dark chocolate surface, I knew I'd found the perfect game day treat.
I'll never forget watching a group of nine-year-olds at a birthday party actually cheer when they saw these brownies arranged on a plate. One kid picked one up, examined the icing laces like it was a real baseball, and said it was "too cool to eat." Of course, he ate three of them anyway, and his mom asked for the recipe before dessert was even finished.
Ingredients
- Unsalted butter (115 g): Use real butter here—it melts into the chocolate more evenly and gives you that glossy, luxurious crumb that makes people ask if these are homemade or from a bakery.
- Semisweet chocolate chips (170 g): This is the star of the show, so don't skimp on quality; cheaper chips can taste waxy, and you'll notice the difference in every bite.
- Granulated sugar (150 g): This keeps the brownies tender and prevents them from becoming dense little hockey pucks.
- Large eggs (2): Room temperature eggs incorporate better and create a smoother batter—set them out while you preheat the oven.
- Vanilla extract (1 tsp): A small amount that rounds out the chocolate flavor without being obvious.
- All-purpose flour (65 g): Measure by spooning flour into your measuring cup and leveling it off; too much flour makes the brownies cake-like instead of fudgy.
- Salt (1/4 tsp): Just enough to make the chocolate flavor pop and balance the sweetness.
- Powdered sugar (60 g): For the icing; sift it if it's lumpy so your piped lines stay clean and white.
- Milk (1–2 tsp): This is your consistency controller—add it slowly so you don't end up with icing that's too thin to pipe.
Tired of Takeout? 🥡
Get 10 meals you can make faster than delivery arrives. Seriously.
One email. No spam. Unsubscribe anytime.
Instructions
- Melt chocolate and butter together:
- Combine the butter and chocolate chips in a microwave-safe bowl and heat in 30-second bursts, stirring between each round until everything is smooth and glossy. The reason I do it in bursts is that chocolate seizes if overheated, and then you're stuck with grainy, broken pieces—I learned that lesson the hard way.
- Let it cool and build your base:
- Once melted, let the mixture cool for a couple of minutes, then whisk in the sugar until it's combined. Add the eggs one at a time, whisking well after each addition so they emulsify properly and create a silky batter. Stir in the vanilla and you've got your foundation.
- Fold in flour gently:
- Add the flour and salt together and fold them in using a rubber spatula, just until no streaks of white remain. This is where patience matters—overmixing activates gluten and makes the brownies tough instead of tender.
- Fill and bake:
- Divide the batter evenly among 24 mini muffin cups (about 3/4 full) and slide them into a preheated 175°C oven. Bake for 16 to 18 minutes until a toothpick comes out with moist crumbs clinging to it—they'll keep cooking slightly as they cool, so err on the side of underbaked.
- Cool with intention:
- Let the brownies sit in the tin for 5 minutes (this makes them easier to remove), then turn them out onto a wire rack to cool completely. They need to be fully cool before you decorate, otherwise the icing will melt and slide right off.
- Create the icing:
- Whisk together powdered sugar, 1 teaspoon milk, and vanilla in a small bowl, adding more milk one drop at a time until the icing is thick enough to pipe but still flows smoothly from the piping bag. Too thin and your baseball laces will be sad blobs; too thick and you'll be fighting to squeeze it out.
- Pipe the baseball laces:
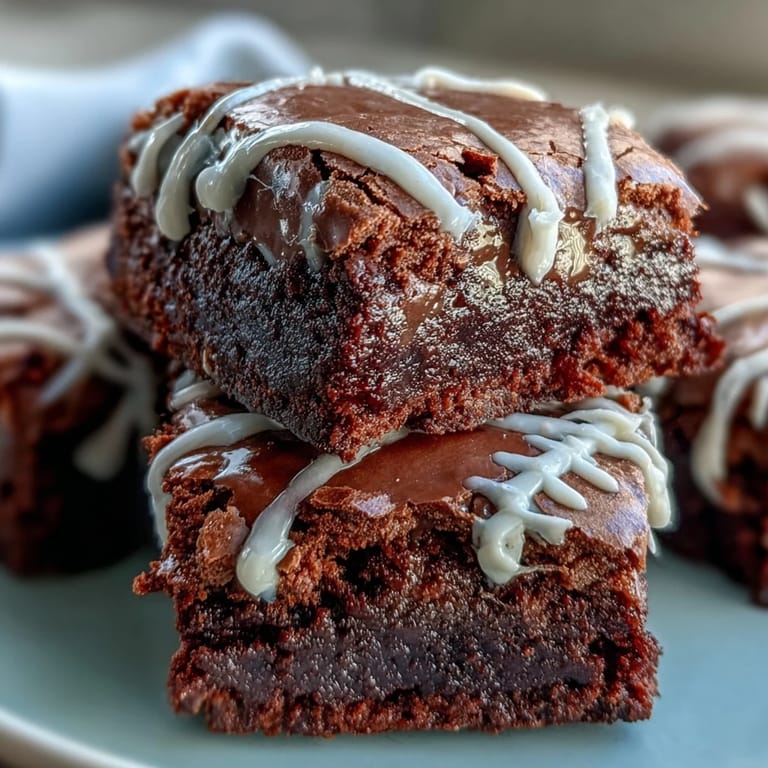
- Transfer icing to a piping bag fitted with a small round or writing tip, then pipe two curved lines on each brownie bite to form the classic baseball stitching pattern. Add small perpendicular lines crossing the curves to complete the effect, then let everything set for a few minutes before serving.
 Save
Save There's something genuinely sweet about watching someone's face light up when they realize a homemade dessert actually looks like something from a fancy shop. That's when these brownie bites stop being just food and become a small moment of joy that people remember.
Timing and Prep Strategy
I always make the brownie batter while my oven is preheating, which saves about 10 minutes. If you're planning ahead, you can bake the brownies in the morning and decorate them an hour or two before the party—the icing sets quickly and holds up well. The whole project feels manageable when you're not rushed, and your hands stay steadier when piping those laces.
Flavor Variations and Customization
The base recipe is chocolate-forward and fudgy, but there's room to play if you want. I've swapped half the flour for cocoa powder on days when I wanted deeper chocolate flavor, and I've added a tablespoon of espresso powder to amplify the richness without making them taste like coffee. For the icing, a tiny pinch of red food coloring turns those white laces into authentic baseball stitching, which feels like a nice touch for themed events.
Storage and Make-Ahead Wisdom
These brownies live happily in an airtight container at room temperature for three days, and I've found they actually taste better the next day once the flavors have settled a bit. If you're making them several days ahead, freeze the undecorated brownies and pipe the icing fresh on the day of your event—it takes five minutes and keeps everything looking pristine. One last thought: keep the decorated brownies away from direct sunlight or warm spots, because the icing can soften faster than you'd expect.
- Don't skip cooling the brownies completely before icing, or you'll end up with melted streaks instead of clean lines.
- If your icing cracks while piping, it's probably too thick—add milk one tiny drop at a time until it flows smoothly.
- Make extra icing in case you want to try again on a bite or two; it's better to have too much than to run out mid-decorating.
 Save
Save These brownie bites have become my go-to move for any sports-themed gathering or kids' party, and honestly, they're just as welcome at a casual game day hangout with friends. There's real joy in serving something homemade that looks thoughtfully decorated and tastes even better than it looks.
Recipe Questions & Answers
- → What ingredients create the fudgy texture?
The combination of melted butter and semisweet chocolate chips provides a rich, fudgy base, balanced with sugar and eggs to create moist brownie bites.
- → How is the white icing made?
The icing is made by mixing powdered sugar with milk and vanilla extract until thick but pipeable, allowing you to create delicate lace designs on each bite.
- → Can these brownie bites be stored?
Yes, store them in an airtight container at room temperature for up to three days to maintain freshness and texture.
- → Is it possible to customize the decoration?
For authentic baseball laces, red food coloring can be added to the icing, or you can experiment with different piping patterns and colors.
- → What baking equipment is required?
A mini muffin tin, microwave-safe bowl, whisk, piping bag or zip-top bag, and a wire cooling rack are essential for preparation and decoration.
- → Are there any allergy considerations?
These contain eggs, milk, and wheat gluten; chocolate chips may contain soy. Always check labels if allergies are a concern.